Translate

Tuesday, February 28, 2012

Baby Cupcake Hat Pattern


Baby Cupcake Hat
Written by Adrena Donnelly 2012
a.k.a Crochet Crazy Mama

Size: Newborn

What You Need:
Size I/9-5.50mm Crochet Hook
Soft 4Ply yarn in Brown, Pink, and Red (I used Caron Simply Soft yarn)
Yarn Needle
Scissors

Skill Level: Easy

Abbreviations:
Ch=Chain
HDC=Half Double Crochet
FP HDC= Front Post-Half Double Crochet
SC=Single Crochet
SlSt=Slip Stitch
St(s)=Stitch(es)
*= Repeat from * as directed

Body of Hat

With Pink, Ch 5, join with a SlSt to beginning Ch.
Round 1: Ch 2, 9 HDC into the center of the loop. Join with a SlSt to top of beginning Ch 2.
Round 2: HDC in same St, 2 HDC in each of the remaining Sts around. Join with a SlSt to top of beginning Ch 2.
Round 3: Ch 2, * 2 HDC in the next St, 1 HDC in the next St. Repeat from * around. Join with a SlSt to top of the beginning Ch 2.
Round 4: Ch 2, 1 HDC in the next St. * 2 HDC in the next St, 1 HDC in each of the next 2 Sts. Repeat from * around. Join with a SlSt to top of the beginning Ch 2.
Rounds 5-8: Ch 2, 1 HDC in each St around. Join with a SlSt to top of the beginning Ch 2.
Round 9: Ch 2, Working in back loops only, 1 HDC in each St around. Using Brown, join with a SlSt through the beginning Ch 2 and last HDC.
Round 10: Ch 2, 1 HDC in each of the next 3 Sts, FP HDC in the next St. *1 HDC in each of the next 4 Sts, FP HDC in the next St. Repeat from * around. Join with a SlSt to top of beginning Ch 2.
Rounds 11-15: Ch 2, 1 HDC in each of the previous HDC, and 1 FP HDC in each of the previous FP HDC around. Join with a SlSt in top of beginning Ch 2.
Round 16: Ch 1, SC in same Ch space. SC in each remaining St around. Join with a SlSt to beginning Ch 1. Tie off and weave in yarn ends.

Frosting

Attach pink to any St on row 9. Ch 2, 2 HDC in the same Ch space. 3 HDC in each remaining St around. Join with a SlSt to top of beginning Ch 2.

Pom Pom Cherry

Using the Red yarn, wrap yarn around 2 fingers several times and then cut leaving a long tail. Thread yarn needle. Weave yarn tail  through middle section of the yarn on your fingers. Don't poke yourself! Pull yarn from fingers and while holding the center of the bunch of yarn, pull the yarn tail tight. Secure it with a few knots. Carefully cut ends of yarn bunch, and then fluff out your yarn. Trim ends until you are satisfied with the size of your pom pom. Use remaining yarn tail to sew the pom pom to top of your cupcake hat.


Crocheted Shell Stitch Scarf


This is a scarf I recently made. I have never made a scarf that wasn't double crocheted back and forth over and over again, so this was a first for me. I really enjoyed making it. I found the pattern for this scarf on YouTube. I followed along with Teresa Richardson's (The Art of Crochet and/or The Crochet Geek) tutorial. It was really really easy to make, and worked up really fast too! I love the shell pattern, it gives the scarf a lot of texture. I had to add some fringe to mine, although she didn't include that in her pattern. Scarves just HAVE to have fringe if you ask me lol. I made this using Redheart Super Saver yarn in "Off White". The color is great because it goes along with many outfits. I've worn this scarf out a few times recently when it was super cold and it really helped to keep me warm. I really like it a lot!


Here is a closer shot of the shell stitches.


Here is a shot of the fringe I added to both ends of the scarf. I just love fringe on scarves. I remember I used to braid all of the little strands on my scarves when I was younger. :)

Monday, February 27, 2012

Crochet Baby Cupcake Hat w/ PomPom


This is a new baby hat that I designed. It's a cupcake! Doesn't it look delicious? :) This hat would fit a newborn baby but can be made larger. I made this one using Caron Simply Soft yarn. I think it is just adorable! Different colors can be used so that it can be worn by baby girls or boys. I will be sharing the pattern for this hat with you soon. (Probably later today)  I would love to see your finished hats. Feel free to share them here on the blog, or you can email me at CrochetCrazyMama@ymail.com and I can post them here. You could also share photos on our Facebook Page: https://www.facebook.com/pages/CrochetCrazyMama-Blog/196370060448021 .


Striped Slouchy Hat Pattern


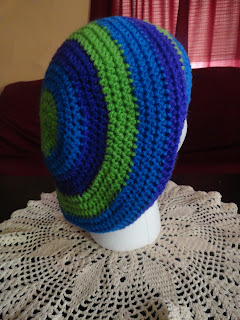
Striped Slouchy Hat
Written By Adrena Donnelly 2012
a.k.a. CrochetCrazyMama

Size: Adult

What You Need:
Size I/9-5.50mm Crochet Hook
4Ply yarn in 3 Colors (Color A, B, and C in pattern)
Yarn Needle

Skill Level: 
Beginner/Easy

Abbreviations:
CH = Chain
HDC = Half Double Crochet
HDC dec = Half Double Crochet Decrease
DC = Double Crochet
SC = Single Crochet
SlSt = Slip Stitch
St(s) = Stitch(es)
* = Repeat from * as directed


Foundation Round: (Using color A) CH 5, join with a SlSt to the beginning CH.

Round 01: CH 2, 11 HDC through the space in the center of the chain loop. Join with a SlSt to the top of the CH 2. (12 Sts)

Round 02: CH 1, HDC in the same CH space. 2 HDC in each of the remaining Sts around. Join with a SlSt in top of the first HDC.

Round 03: CH 1, HDC in the same CH space. *2 HDC in the next St, 1 HDC in the next St. Repeat from * around. Using color B, join with a SlSt through first and last HDC.

Round 04: CH 1, HDC in the same CH space. 1 HDC in the next St. *2 HDC in the next St, 1 HDC in each of the next 2 Sts. Repeat from * around. Join with a SlSt in top of the first HDC.

Round 05: CH 1, HDC in the same CH space. 1 HDC in each St around. Join with a SlSt in top of the first HDC.

Round 06: CH 1, HDC in the same CH space. 1 HDC in each St around. Using color C, join with a SlSt through first and last HDC.

Round 07: CH 1, HDC in the same CH space. 1 HDC in each of the next 2 Sts. *2 HDC in the next St, 1 HDC in each of the next 3 Sts. Repeat from * around. Join with a SlSt in top of the first HDC.

Round 08: CH 1, HDC in the same CH space. 1 HDC in each of the next 3 Sts. *2 HDC in the next St, 1 HDC in each of the next 4 Sts. Repeat from * around. Join with a SlSt in top of the first HDC.

Round 09: CH 1, HDC in the same CH space. 1 HDc in each St around. Using color A, join with a SlSt through first and last HDC.

Round 10: CH 1, HDC in the same CH space. 1 HDC in each of the next 4 Sts. *2 HDC in the next St, 1 HDC in each of the next 5 Sts. Repeat from * around. Join with a SlSt in top of the first HDC.

Round 11: CH 1, HDC in the same CH space. 1 HDC in each of the next 5 Sts. *2 HDC in the next St, 1 HDC in each of the next 6 Sts. Repeat from * around. Join with a SlSt in top of the first HDC.

Round 12: CH 1, HDC in the same CH space. 1 HDC in each St around. Using color B, join with a SlSt through first and last HDC.

Round 13: CH 1, HDC in the same CH space. 1 HDC in each of the next 2 Sts. *2 HDC in the next St, 1 HDC in each of the next 3 Sts. Repeat from * around. Join with a SlSt in top of the first HDC.

Rounds 14-15: CH 1, HDC in the same CH space. 1 HDC in each St around. Join with a SlSt in top of the first HDC. At the end of row 15, using color C join with a SlSt through first and last HDC.

Rounds 16-18: CH 1, HDC in the same CH space. 1 HDC in each St around. Join with a SlSt in top of the first HDC. At the end of row 18, using color A join with a SlSt through first and last HDC.

Round 19: CH 1, HDC in the same CH space. 1 HDC in each of the next 2 Sts. * Work a HDC dec in the next St, 1 HDC in each of the next 3 Sts. Repeat from * around. Join with a SlSt in top of the first HDC.

Round 20: CH 1, HDC in the same CH space. 1 HDC in each of the next 3 Sts. * Work a HDC dec in the next St, 1 HDC in each of the next 4 Sts. Repeat from * around. Join with a SlSt in top of the first HDC.

Round 21: CH 1, HDC in the same CH space. Work 10 HDC dec. 1 HDC in the next 33 Sts. Work 10 HDC dec. HDC in last St. Using color B, join with a SlSt through first and last HDC.

Rounds 22-24: CH 1, DC in the same CH space. 1 DC in each St around. Join with a SlSt in top of the first DC.

Round 25: CH 1, SC in the same CH space. 1 SC in each St around. Join with a SlSt in top of the first SC. Tie off and sew in yarn ends.

Striped Slouchy Hat


This is my new slouchy hat design! It took me a while to perfect it the way I wanted, but I am happy with the way it turned out. This is a beginner pattern. I will be sharing this pattern with you all today. So make sure to come back and look for it if you are interested. I would love to see how yours turns out! I made this one using RedHeart Super Saver yarn. I think depending on the yarn you use this hat will be a little slouchier. Is "slouchier" even a word? LOL Anyway, this hat is for an adult size, but decreasing the amount of stitches in the increase round, or using a smaller hook you could always make the hat smaller. The same goes for making it bigger, just use a larger hook, and/or add a few extra stitches to the increase round. Hope you all like it! :)


Monday, February 6, 2012

ChiaoGoo Premium Bamboo Crochet Hooks (Review)


I recently spotted these crochet hooks on ebay and I read up on them a little and decided to check them out. I purchased 3 of them in different sizes. I am sometimes a little nervous when buying stuff on ebay because you can't always trust sellers on there. Well fortunately this seller was awesome. Although the packaging looks like it came from overseas, this product actually shipped from here in the US and it only took a couple of days! :) These were brand new items that were still sealed in the package and everything was just as described. These weren't very expensive either, only about a dollar more than I normally pay for aluminum hooks.


These hooks are made from a premium Chinese Moso bamboo. This is a very strong bamboo. They are handcrafted, which I find amazing. They had a couple of different colors, but I went with the natural ones. The  size is laser printed on the hook so that it will never fade, another great feature. On the back of the hook just opposite of the size, a word has been laser printed in both Chinese and English. The 3 hooks that I got had Freedom, Peace, and Love printed on them. 


When compared to aluminum crochet hooks (which is what I have most commonly used), they measure up about the same. Stitches come out exactly as they do with the aluminum ones. The tip has a slightly different angle to it which to me seems to grab hold of a string of yarn very easily. Yarn flows very smoothly across the surface of the hook. The bamboo hooks weigh much less than the aluminum ones and don't seem to tire out my hands as fast. One thing I liked a little more about these is that they are warm when you touch them. Aluminum hooks are always cold when I first pick them up. 

Overall I like these hooks a lot. I am actually thinking of purchasing a few more in different sizes. I won't stop using aluminum hooks all together, but I can definitely see myself switching between them and the bamboo much more in the future. If you are interested in finding these, the seller has a website. Visit  http://verticalproducts.com/  to find these bamboo hooks, knitting needles and other neat products. You can also search for them on ebay if you wanted. That's where I got mine! :)